Breathing, like walking, is something all of us do everyday. It’s even something we do all the time, whether we’re conscious about it or not. For this reason, it is an activity that can carry lots of habits, some of which can be unhelpful. That is why I decided to start another series of posts here, about breathing. The exercises I will offer are taken from my experience with qigong and martial arts, academic reading (mostly “Anatomy of Breathing” by Blandine Calais-Germain) and my own exploration of breathing – I’m asthmatic, and the first personal memory I have is of playing with various ways of breathing when I was four.
This post presents the foundation of qigong breathing meditation, parts of which are recognised by the NHS to help with stress, anxiety and depression, and part of which is a good exercise to help control your core. Additionally, from a qigong perspective, it is the beginning of accumulating qi in the dan tian, the “battery” of our body.
First part: regulating the speed
The first part is really simple and can be done pretty much in any situation and any position, though it yields stronger relaxation when done together with the second part. It consists simply of breathing slowly and regularly, in through your nose and out through your mouth. More precisely, when you breathe in, slowly count to however many feels like a full inhalation, and the breathe out for the same count (we aim for the same duration). It helps to make a slight sound when you breathe out, like a “ffff” or a “hhhh”. Spend some breaths regulating so that you inhale and exhale the same quantity. You will then breath in and out at the same rate.
The next step is to add a small hold at the end of each phase: if you were breathing in for 4 counts, and out for 4 counts, change that to breathing in for 4 counts, hold for 1 count, breathe out for 4 counts, and hold for 1 count.
The step after that is to slow everything down: slowly add counts as your breathing becomes more calm and steady. Depending on many factor, like if you just exercised, your emotional state, and your habit of working on your breathing, it can be more or less challenging. The goal here is not to “push yourself” but to explore how much you can do. If today, you started counting to 3, and managed to go to holds, and to extend to 4 after 5 minutes, that’s great! If you started at 8 and managed to go to 12 in 2 minutes, that’s also great! The only thing that counts is actually doing it.
Second part: regulating the shape
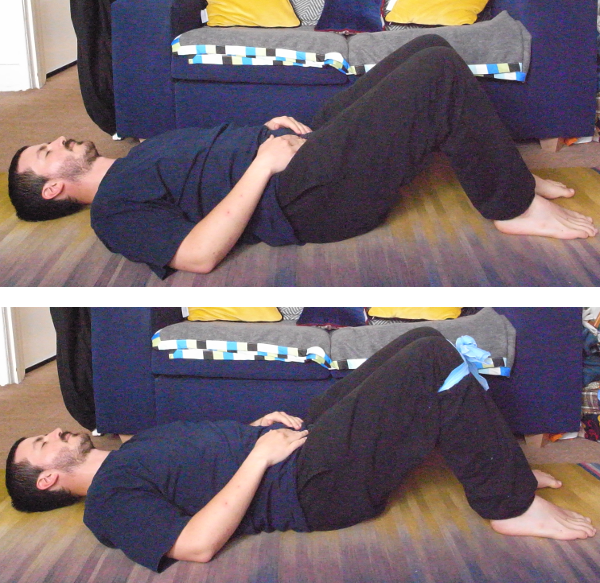
The second part is about how you breathe, so this requires a bit more in terms of setting. First the position: there are many possibilities, granted they allow your core to relax. If you’re unsure, I suggest starting on your back, with your legs folded so that both your feet are flat on the ground, roughly two fists apart (if you know where your hip joint is, hip-width apart – it should be roughly the same). If you’ve heard of “constructive rest position”, then use it. If, like me, your knees tend to flop out in this position, you can tie them together with a scarf or a belt.
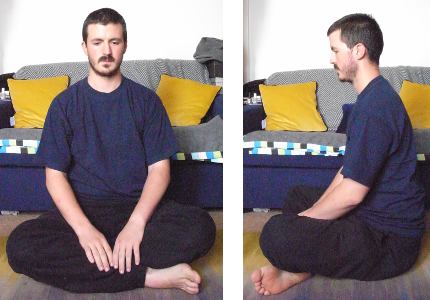
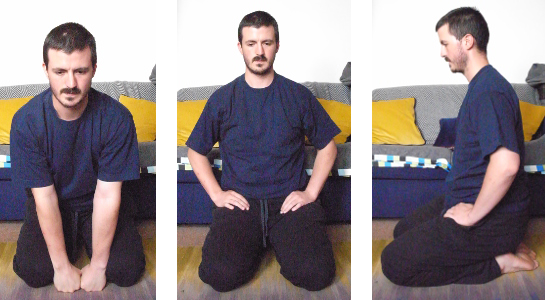
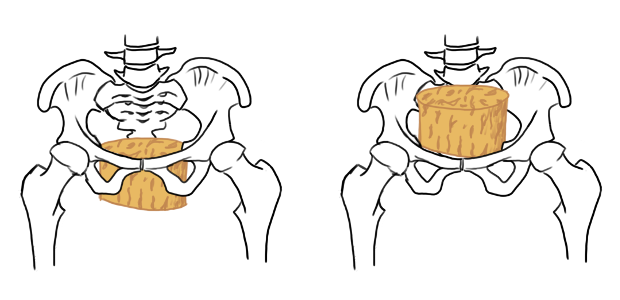
If you’re confident that you have good sitting posture, you can sit on a chair with your feet flat on the floor, or directly on the floor, either cross-legged or on your knees (in which case, again, place your knees or feet hip-width – or two fists – apart). In any case, make sure your pelvis is correctly placed (see my previous post about pelvic placement in sitting).
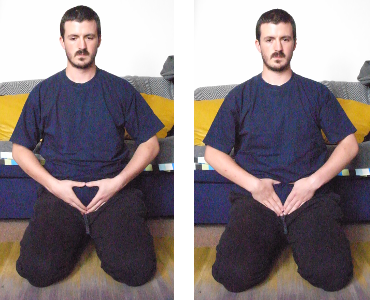
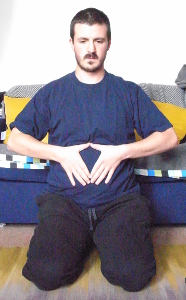
We’re going to, again, use imagery. The image we’re going to use is that the movement of the lowest part of the abdomen (below the six-pack, if you wish) powers the breathing. To help with this image, you can put your hands in a diamond with your thumbs on your bellybutton (see pictures below), and think of this area moving the most. As always with imagery, don’t try and make this happen (it won’t, unless you contract many other things in your abdomen, which is a cool exercise, but in a way more advanced than this one), and simply let the image do the work. Especially when breathing in, you can think of your hands being attached to your abdomen like a suction cup, and pulling your belly away to make space for air to come into you lungs. If you’re interested in the qigong aspect, the dan tian is about two fingers below the belly button, slightly above the centre of the diamond. You can also think of this point generating the breathing movement.
If you’re struggling with breathing through your belly, maybe you think that it’s anatomically incorrect, and that’s blocking you. If this is the case, see the “Some anatomy” paragraph below. If not, here are some alternative images and exercises to start breathing through your belly:
- You can think of your whole torso that you have to fill with liquid air. Naturally, this liquid air will go down first (try filling a glass top-first!).
- Breath out completely, and gently press a hand on your belly. Use your belly to push out the hand as you breathe in.
- Your belly inflating is creating a vacuum, which sucks air into your lungs.
- Your lungs inflating push your organs down, and they go out in front of you to keep their volume.
Taking it further
This image is only a beginning, and can be expanded in many exciting directions! Here are a few of them:
- Think of two points, the dan tian (two fingers below the bellybutton) and the point opposite to it on the back, getting away and together to power the breathing.
- Think of the whole section of your abdomen at roughly the same level as the diamond of earlier expanding in every direction: front, back, right, left, … (if you like anatomy, the belt between your pelvis and your ribs).
- Think of a whole sphere, centred in the middle of your body and at the height of the dan tian, inflating and deflating to create the movement of breathing.
- Think of the two sections of muscle on your back, either way of the spine, as being the places that move most (like the diamond we talked about earlier). This one is particularly challenging, and rewarding, if you suffer from lower back pain!
- Think of either part of the “belt” moving most. For instance, the bit between the “six-pack” and the right side line.
- Think of the part of the rectus abdominus (the muscle forming the six-pack, that continues below to the pubis, and above to the ribs) above the six pack as moving the most.
Explore them, and notice how different they make you feel.
Some anatomy
As for many images, it’s sometimes challenging to reconcile anatomical knowledge and the image. In this case, it is quite straightforward: when you breathe in and out, the diaphragm, a muscle situated just below your heart, and attached to the bottom of the rib-case, goes down and up, changing the volume of the lungs. Below the diaphragm are many of your organs and a lot of connective tissue, which behave pretty much like water: they can change shape, but not volume. When the diaphragm goes down, they have to make space for the extra volume of air in the lungs, and they go forward, or to the sides (and maybe a tiny bit to the back, if you’re very relaxed).
When a person is tense, or if for any other reason, their organs and diaphragm aren’t able to move that much, the breathing will happen in the rib-case, which will change shape to create more volume for the lungs. This puts a lot of strain in muscles that also participate in posture (like some deep neck muscle) or in stabilising the shoulder girdle. Therefore, if you regularly feel tensions in your neck, or if your shoulder tend to slump or tense up, these exercises can be great for you!
Continue reading: Pelvic Floor Breathing, An Image for Relaxed Shoulders, Self-Treatment for Headaches.
This article also exists in French.
Want more like this?
Check out the following blogs from massage therapists I know from around London:- On The Run Health and Fitness on running, nutrition and sports massage.
- The Soma Room on sports massage and exercise.
No Responses